

P710 IP PRO Short User Manual

Version: 2024/12/17 00:00
Additional:
Translation in your language, please select translation and language in your browser settings
Search function, please press "control + F"

Gigaset P710 IP PRO - Short User Manual
Table of contents
- Table of contents
- Safety precautions – Manufacturers advice
- Setting up the Phone
- Initializing and registering the phone
- Getting to know your phone
- LED indicators
- Using the phone
- Phonebook
Safety precautions – Manufacturers advice
Safety precautions

Read the safety precautions and the user guide before use.
Comprehensive user guides for all telephones and telephone systems as well as for accessories can be found online at wiki.gigaset.com. We thereby help to save paper while providing fast access to the complete up-to-date documentation at any time.

The device cannot be used in the event of a power failure. In case of a power failure it is also not possible to make emergency calls. Emergency numbers cannot be dialled if the keypad/display lock is activated!

Do not use the devices in environments with a potential explosion hazard (e.g. paint shops).

The devices are not splashproof. For this reason do not install them in a damp environment such as bathrooms or shower rooms.

Use only the power adapter indicated on the device. Whilst powering, the power socket must be easily accessible. Use only the cable supplied for LAN connection and connect it to the intended ports only.

Remove faulty devices from use or have them repaired by our Service team, as these could interfere with other wireless services.

Do not use the device if the display is cracked or broken. Broken glass or plastic can cause injury to hands and face. Send the device to our Service department to be repaired.

Keep small parts, cells and batteries, which can be swallowed, out of the reach of children. Swallowing a battery can lead to burns, perforation of soft tissue and death. Severe burns can occur within 2 hours of swallowing. In the case of a swallowed cell or battery, seek medical care immediately.

To prevent loss of hearing, avoid listening at high volume over long periods of time.

Using your telephone may affect nearby medical equipment. Be aware of the technical conditions in your particular environment, e.g. doctor's surgery. If you use a medical device (e.g. a pacemaker), please contact the device manufacturer. They will be able to advise you regarding the susceptibility of the device to external sources of high frequency energy (for the specifications of your Gigaset product see "Technical data").
Customer service & Support
Do you have any questions?
You can get quick help and information in this user manual and at wiki.gigaset.com.
Information on the topics
- Products
- Documents
- Interop (interoperability)
- Firmware
- FAQ
- Support
can be found at wiki.gigaset.com. If you have any further questions about your Gigaset product, your specialist reseller will be happy to help.
Authorisation
Voice over IP telephony is possible via the LAN interface (IEEE 802.3).
For further information please contact your Internet provider.
The information on the compliance of our products with the UK Product Security and Telecommunications Infrastructure (PSTI) Act 2022 is available at the following internet address: www.gigaset.com/PSTI
Country-specific requirements have been taken into consideration.
We, Gigaset Technologies GmbH, declare that this device meets the essential requirements and other relevant regulations laid down in Directives 2014/30/EU and 2014/35/EU.
The full text of the EU declaration of conformity is available at the following internet address: www.gigaset.com/docs.
If this product will as well be imported into the UK:
Gigaset Technologies GmbH hereby declares that the following radio equipment types are in compliance with the Radio Equipment Regulations 2017: xxxxx
The full text of the UK declaration of conformity is available at the following internet address: www.gigaset.com/docs.
This declaration could also be available in the "International Declarations of Conformity" or "European Declarations of Conformity" files.
Therefore please check all of these files.
Environment
Environmental management system
Further information on environmentally friendly products and processes is available on the Internet at www.gigaset.com.

Gigaset Technologies GmbH is certified pursuant to the international standards ISO 14001 and ISO 9001.
ISO 14001 (Environment): Certified since September 2007 by TÜV SÜD Management Service GmbH.
ISO 9001 (Quality): Certified since 17/02/1994 by TÜV SÜD Management Service GmbH.
Disposal
All electrical and electronic products should be disposed of separately from the municipal waste stream via designated collection facilities appointed by the government or the local authorities.

This crossed-out wheeled bin symbol on the product means the product is covered by the European Directive 2012/19/EU.
UK: The Waste Electrical and Electronic Equipment Regulations 2013.
The correct disposal and separate collection of your old appliance will help prevent potential negative consequences for the environment and human health. It is a precondition for reuse and recycling of used electrical and electronic equipment.
For more detailed information about disposal of your old appliance, please contact your local council refuse centre or the original supplier of the product.
Care
Wipe the device with a damp cloth or an antistatic cloth. Do not use solvents or microfibre cloths.
Never use a dry cloth; this can cause static.
In rare cases, contact with chemical substances can cause changes to the device’s exterior. Due to the wide variety of chemical products available on the market, it was not possible to test all substances.
Impairments in high-gloss finishes can be carefully removed using display polishes for mobile phones.
Contact with liquid
If the device comes into contact with liquid:
- Unplug all cables from the device.
- Allow the liquid to drain from the device.
- Pat all parts dry.
- Place the device in a dry, warm place for at least 72 hours (not in a microwave, oven etc.) with the keypad facing down (if applicable).
- Do not switch on the device again until it is completely dry.
Setting up the Phone
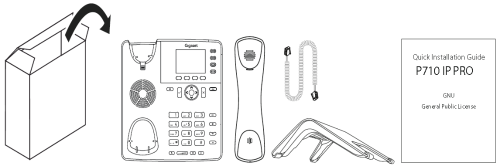
Delivery Content
- Base phone unit
- Footstand
- Handset
- Handset cord
- Quick Installation Guide, GNU General Public Licence
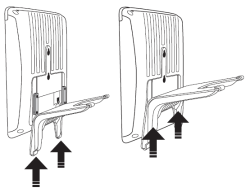
Attaching footstand and handset
The footstand can be attached at two different angles: 46° and 28°.
Note: Before attaching the footstand to the phone, plug the long end of the handset cord into the connector labelled " " on the back of the phone and place the cord in the cable guide.
1. Place the top of the grooves on the footstand below the slideguides on the back of the phone.
2. Push the footstand upwards onto the slideguides until they lock in place.
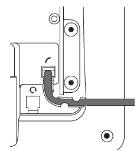
3. Plug the short end of the handset cord into the connector on the handset.
4. Place the phone on an even, horizontal surface.
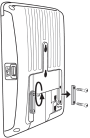
Wall mounting
- Anchor the screws in the wall.
- Unscrew the slide guides for the footstand from the back of the phone.
- Plug the long end of the handset cord into the connector labelled "" on the back of the phone and place the cord in the cable guide.
- Hang the phone on the screws by placing the holes on the back of the phone over them.
Rotating the tab of the cradle
The phone is delivered with the tab level with the inner edge of the cradle. If you are going to mount the phone on a wall, we recommend that you rotate the tab 180°. After rotation, the tip of the tab will protrude slightly above the edge of the "cradle". The small rectangular hole in the receiver casing fits perfectly over the now protruding tip, holding the receiver safely in place in the upright position on the wall.
- Slide the plastic tab from the cradle.
- Rotate the tab 180°.
- Slide the tab back into the cradle. The top of the tab now protrudes slightly above the inner edge of the cradle, so that it will hold the handset more securely.
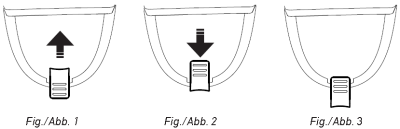
Connecting the phone
(1) If PoE not available
(2) Not included in delivery
(3) Optional
The phone can be operated with Power over Ethernet (PoE) provided via the network cable or, if PoE is not available in your network, with the separately available 5V DC power adapter.
- Plug the long uncurled end of the 4P4C handset cord into the connector labelled
 , and connect the short one to the handset.
 - Plug the Ethernet (network) cable into the RJ45 connector labelled NET and plug the other end into the network side to establish a data link.
- If PoE is not available, insert the plug of the power supply into the connector labelled 5V DC and hook up the plug to the wall outlet.
- The other RJ45 connector, labelled PC, is for daisy-chaining further Ethernet devices without the need for a second Ethernet connection line.
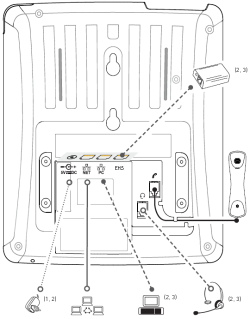
Initializing and registering the phone
After you have set up the phone and connected it to the network, it will begin to initialize. Normally the initialization is completely automatic, using DHCP.
If your network does not support DHCP, you must obtain the IP address, netmask, IP gateway, and DNS server from your Internet service provider or your network administrator and enter them manually when you are asked to do so on the display.
NOTE: In must cases, the phone will be automatically configured or manually by the network administrator. If not available then you will need the registration information received from your Internet service provider or your network administrator -
normally the phone or extension number, the password, and the registrar. The configuration is then done via the device web-interface see: wiki.gigasetpro.com
Getting to know your phone
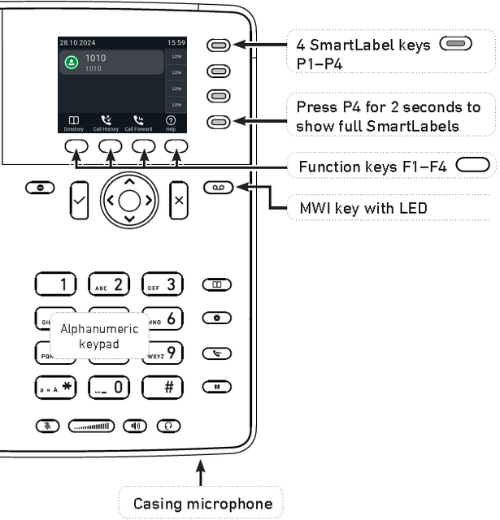
Context-sensitive, programmable function symbols and function keys F1–F4
Press the function key underneath the display symbol to activate the function, open the list etc. depicted by the symbol above the key.
Audio control keys
 Adjusting the volume
- of the ringer when the phone is idle or ringing
- of the handset/casing loudspeaker when in a call
 Mute/unmute microphone
 Toggling between handsfree and handset mode. Press to dial number and accept calls on speakerphone.
 Headset mode on/off
Dedicated, customizable function keys
 MWI key
 Turn DND (do not disturb) on and off . Callers hear the busy signal.
 Directory
 Settings menu
 Transfer
 Hold
Hold
Navigation keys
- Confirming, saving actions & input, and returning to previous screen
- Accepting calls on speakerphone and in headset mode
- From idle screen: Dialed calls (redial)
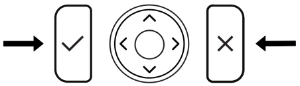
- Cancelling actions & input, and returning to previous screen
- Terminating calls on speakerphone and in headset & handset modes

 From idle screen: Select outgoing identity
 From idle screen: Received calls
 From idle screen : Missed calls
In other contexts (settings, lists): Navigate up/down
In other contexts: Navigate/space left
In other contexts: Navigate/space right
SmartLabel keys with LED P1–P4
Default setting: Line
- Fast-blinking LED: Incoming call. Press key or
 to accept
 - Steadily lit LED: In call
- Slow-blinking LED: Call on hold
Star key
In editing mode:
- Press for one second to change input mode (numerals > lower case > upper case)
- Press briefly to type *
On idle screen: Press for 3 seconds to lock/unlock the keypad
LED indicators
Call indicator
The bright-red LED situated at the top of the display indicates incoming, ongoing, held, and missed calls. It will be:
- Blinking rapidly when a call is coming in
- Glowing steadily when dialing, when in a call, and when you have missed a call. To turn the LED off after a missed call, press the left arrow on the navigation key to open the Missed calls menu and simultaneously turn off the LED.
- Blinking slowly when you have put a call on hold
SmartLabel key LED
Depending on the function mapped onto the key, the red or green LEDs on the key will be activated when the key event occurs. The factory setting is red LED and "line". The LEDs of a line key will:
- blink rapidly when a call is ringing on the line;
- glow steadily when there is an ongoing call on the line;
- blink slowly when a call is on hold on the line;
- be off when the line is free.
When other functions are mapped onto the keys, the LEDs may glow or blink. For example: When the "extension" function has been mapped onto a key and monitoring of extensions is enabled on both phones, the LED will
- blink rapidly when a call is ringing on the extension;
- glow steadily when the extension is busy;
- be off when the extension is not busy.
Using the phone
Making calls
Handset
Pick up the handset, enter the phone number, and press  or the center key OR
Enter the phone number and pick up the handset.
Headset
Enter the phone number, and press  .
.
Speakerphone
Enter the phone number and press  or the center key.
Handset or headset and casing speaker
With dual audio mode activated, other persons present in the room are allowed to listen in to the third party over the phone's casing loudspeaker.
- Use the method for handset or headset use to dial.
- When the call has been established, press
 to enable the casing loudspeaker. Press
  to turn the speaker off.
Accepting calls
Headset:
Press . If the phone is already in headset mode, you can also press the blinking line key.
Speakerphone:
Press or the blinking line key.
Call pick-up from another extension
You can pick up calls ringing on another extension, for example when the other extension is busy or when the user is absent, when the following prerequisites for this function are met:
- It must be supported by the PBX.
- The extensions whose calls you want to pick up on your own extension must permit this function. It is possible but not required to restrict the permission for monitoring to certain users or groups of users.
- Each extension to be monitored must be programmed onto one of the freely programmable function keys with LEDs.
When these prerequisites are met, the status of the monitored extension is indicated by the LED of the function key:
- Blinking LED: Incoming call ringing. If the call is not answered, press the key to pick it up;
Call waiting
When you are in a call, another call coming in will be announced visually by the flashing call LED and by the symbol appearing in the function key line; it will also be announced acoustically by a double beep.
When a call is waiting, you have the following options:
- Press the blinking line key of the call waiting to put your current call on hold and to accept the second call without knowing who is calling. This option is available only when there is a free line key available at the time the call comes in.
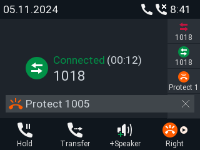
- Press the function key underneath
 to put the Call waiting screen on the display; you will see the caller ID on-screen if it is being transmitted.
- Press
 to reject the call waiting. The caller will hear the busy signal.
 - Press to accept the second call and put your current call on hold.
- Press
 to return to the Connected screen with your current connection.
Note: Pressingand will affect the call shown on the display, i.e., your current connection, the call(s) waiting, or the call(s) on hold. - If there is more than one call waiting, press the keys or , respectively, to bring them on-screen and to return to the connected call.
- Press
- If you do not wish to accept the waiting call, you can:
- ignore the announcement. If you have set call forwarding when busy, the call will be transferred to that phone.
- reject the incoming call by putting the Call waiting screen on the display and pressing .
The caller hears the busy signal. Pressingfor three seconds will also put the caller on the "Deny" list of the phone's directory. Future calls from this number will not ring on the phone; the caller hears the busy signal.
Hold
Press  to put the ongoing call on hold. Held calls are indicated threefold:
- By the text on the display.
- By the slowly blinking line key.
- By the slowly blinking call indication LED.
- By the double beep.
You can now: - Transfer the held call blindly or with prior announcement
- Receive and make calls and put other calls on hold.
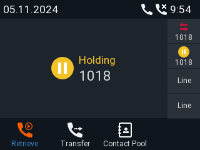
Pick up the held call by pressing its line key or by pressing again. If the other party hangs up while on hold, the call is terminated on your phone as well and the LED indicators are turned off.
Conference
The maximum number of participants is three.
Initiating a conference
- Call the first intended participant and put him or her on hold.
- Call the second intended participant.
- When you are connected to the participant, press
 to start the conference.
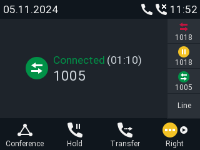
- Selecting individual participants.
- On the conference screen, press on the navigation key or the function key underneath
 to select the first of the participants of the conference; press or again to select the next one of the participants.
 - When viewing the second participant, press or
 to view the first participant.
 - When viewing the first participant, pressor to return to the conference screen.
- On the conference screen, press
- Talking to one participant in private. With one of the participants on-screen, press to converse with that participant in private and to put the other party on hold. To restart the conference, press .
- Putting one participant on hold. With one of the participants on-screen, press to put this party on hold and to converse with the other party in private. To restart the conference, press .
- To terminate the conference and the connections to both parties, return to the conference screen and press .
Transferring calls
You can transfer connected calls as well as calls ringing on your phone.
- When you have a call on the line, there are two ways to transfer it to a third party:
- Announcing the call to the third party first, to make sure the call is welcome and will be accepted: Attended transfer;
- Transferring the call unannounced: Blind transfer. There will be no feedback on whether the third party is available and/or picking up the call.
- When a call is ringing on your phone, you can transfer it to a third party without answering it first (blind transfer only).
Attended transfer
- Put the call on hold .
- Dial the number you want to transfer the call to and announce the call. You can also select a number from the internal or one of the available external phone directories
- If the third party wants to accept the call, hang-up the call.
Blind transfer
- With a call on the line, press
 . The dial screen will appear.
 Dial the number, or select a number from the internal or one of the available external phone directories
Press
. You may briefly see two "Ended" messages followed by the callee and caller's name/number, indicating that the transfer was completed.
Terminating calls
- When using the handset: Place the handset in the cradle or press .
- When using speakerphone or a headset: Press .
Missed Calls
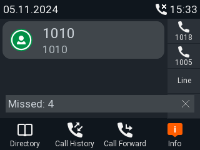
Missed calls are indicated by the call LED (steady light), the missed call symbol in the status line, and by the "Missed" message with the number of missed calls on the display and on the Status info screen).
- To view your missed calls, press the right arrow on the navigation key. The red dot indicates the arrival of new missed messages since the last time the missed calls were viewed. It is removed from the list of all calls and turns blue in the list of missed calls once the list has been viewed.
Call lists
Three call lists of missed, dialed, and received calls are stored on the phone. They contain the number, time and date, and duration of the calls. If the memory allotted to the storing of call lists is full, the oldest ones will be overwritten.
- Press
 to open the call history.
The red dot indicates the arrival of new missed messages since the last time the missed calls were viewed. It is removed from the list of all calls and turns orange in the list of missed calls once the list has been viewed. - To view the list of missed, received, or dialed calls, press the left and right arrows on the navigation key to put the lists on-screen one after the other.
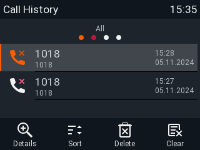
Note: On the idle screen you can also use the following keys to view the lists directly (default setting):
- Missed calls: Press the right arrow on the navigation key.
- Received calls: Press the left arrow on the navigation key.
- Dialed calls: Press .
- Missed calls: Press the right arrow
3. On each list, the latest call is at the top of the list. Scroll through the list with the up/down arrows on the navigation key. The icons indicate the type of call:
 - Missed call
 - Received call
 - Dialed call
- Press to dial the number of the selected call.
- Press
 to delete the selected call.
 - Press
 to clear the entire list.
 - Press for three seconds to return to idle screen.
- Press
 to sort the calls.
 - Press
 to show the call details of the selected call.
Locking and unlocking the keyboard
When the keyboard is locked, only the emergency numbers configured on the Preferences page of the phone's web user interface can be dialed.
Setting a PIN to unlock the keyboard (optional): See "Setting a PIN to unlock the keyboard"
Locking
Press a  for three seconds. The lock symbol appears in the status line. It also replaces the identity symbol.
Unlocking
Press for three seconds to unlock the keyboard.
- If a PIN for unlocking the keyboard has been set, you will be prompted to enter the PIN.
Rejecting or redirecting incoming calls
If you do not wish to pick up a ringing call, you have three options: Letting the call ring and not picking it up, rejecting it manually, or transferring it manually to a third party.
- Rejecting a ringing call manually.
- Press . The caller will hear the busy signal.
- Press
- Transferring the ringing call to another phone (blind transfer).
Call forwarding
The phone can be set to forward incoming calls, either always or under certain conditions. The settings can be done on the phone and on the web interface. For further information on using the web interface for these settings, see "Call forwarding"
Note: Call forwarding is set separately for each configured identity. When the setting is done on the phone, it applies to the identity selected as outgoing identity.
Forward All: Forwarding all incoming calls to the number of the phone, extension, or mailbox specified as this function’s target.
In the default setting, the symbol is available in the function key line, and pressing the associated key turns forwarding of all calls on and off, respectively. You can also map the function onto another function key or use the settings menu as shown in the table below.
Forward when Busy: Forwarding calls ringing while the phone is busy to the number of the phone, extension, or mailbox specified as this function’s target.
Forward after Timeout: When a call starts ringing, the phone will wait for the number of seconds specified in the setting "Call forwarding time". If the call is not accepted by the end of this time period, it is forwarded to the number of the phone, extension, or mailbox specified as this function’s target.
Settings on the phone and turning on call forwarding
Forward all | Forward when busy | Forward after timeout | |
|---|---|---|---|
Press |
|
|
|
Press |
|
|
|
Press |
|
|
|
Press |
|
|
|
Press |
|
|
|
Press |
|
|
|
Type | phone number | phone number | phone number |
Press |
| ||
Type | number of seconds | ||
Press |
| ||
 Call Features
 Call Forwarding
 Forward after Timeout
Turning off call forwarding
Forward all | Forward when busy | Forward after timeout | |
|---|---|---|---|
Press |
|
|
|
Press |
|
|
|
Press |
|
|
|
Press |
|
|
|
Press |
|
|
|
Turning forwarding of all calls on/off with a function key
Turning call forwarding on
Note: Call forwarding is set separately for each configured identity separately. When the setting is done on the phone, it applies to the identity selected as outgoing identity.
Press
 . The display will show the Target when Forwarding screen.
Note: If
is not available when the display is in idle mode, you can make it available on the Function Keys page of the phone's web interface. For further information see chapter Configuring the function keys, "Example 3, changing setting of context-sensitive key"- If no forwarding number has been set or if it needs to be changed, make the necessary entries.
- Press
Turning call forwarding off
Press the function key underneath
Phonebook
Directory
The directory is the built-in directory of the phone. It can hold up to 1000 entries. Entries can be added and edited on the phone and on the web interface.
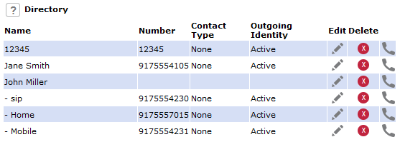
Any changes you make on the web interface will not take effect until you click "Save" or on "Apply" and "Save", depending on your firmware version. Changes will be lost if you open another page of the web interface without first clicking on "Apply"/"Save".
Definitions, explanations
Directory entries
Each entry must have at least one phone number; multiple associated phone numbers are possible. If you do not enter a first and/or last name and/or nickname, the phone number will appear under both "Name" and "Number".
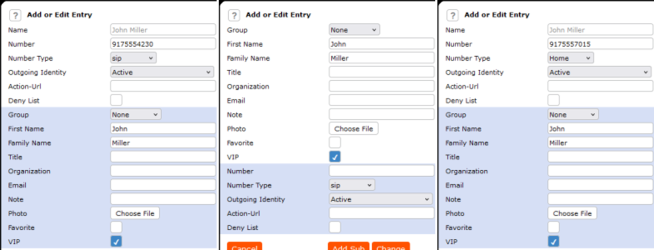
- Entry with one phone number:

- Entry with several associated phone numbers:

Name area. Same data for the master record and all sub entries.
Blue area. Data can be different for each associated phone number. If sub entry text fields are blank, the data from the master record is displayed.
Contact Types
VIP: Calls from numbers with this contact type will ring on your phone even when DND mode is active.
You can assign a ringtone to this contact type. If your VIP is also assigned to a group (see below) and if that group has a distinct ringtone, the ringtone assigned to the group will be played.
Deny List: Calls from phone numbers with this contact type will not ring on your phone. The caller hears the busy signal. To remove the number from the deny list, you can either
- delete the entry from the directory by clicking on the delete symbol

- or - if you want to keep the number in the directory - change the contact type to none or VIP by editing the entry.
Outgoing identity
The default setting is "Active" which means that the phone will use the current outgoing identity whenever you dial the number of the phone book entry.
You can also select a specific identity to be used as the outgoing identity whenever the number is dialed, for example, if you want to use a specific VoIP provider for these calls.
Note: To use an outgoing identity specified in the directory, you must dial the number from the directory. If you simply type it on the keypad, the current outgoing identity, as indicated on the display, will be used.
Group
The available group types are Friends, Family, Work, Colleagues, or None. The default setting is none. You can assign a distinct ringtone to each group type.
Ringtones
The phone has 10 built-in ringtones that can be assigned to identities, group types, and contact types.
It is also possible to download a custom melody.
Adding/Editing Entries on the Phone
Adding new entry manually
- Press
 to open the phone's directory.
 - Press the function key underneath
 .
. - Enter the phone number and press
- Enter a first name and/or press .
- Enter a last name and/or press.
Note: Entering a first and/or name is optional. If you don't enter either one, the entry will be listed under the phone number. You can add a first and last name later by editing the entry on the phone or on the web interface.
Adding new entry from call list
- Press the function key underneath
 to open the call history. The list of all calls appears.
- Press / on the navigation key to show the lists of missed, received, or dialed calls instead.
- Press
- Press / on the navigation key to select a call.
- Press
 to view call Details.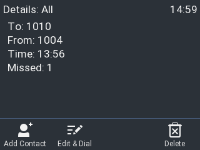
- Press to add the name (if the name was transmitted) and the number to the phone directory. If the name has not been transmitted, the number will be used in its place.
Sorting entries
- Press to open the phone's directory.
- Press
 .
. - Use/ to select the criterion for sorting (nickname, first name, last name, organization, etc.) and press to sort.
Editing existing entry
- Pressto open the phone's directory.
- Selecting an entry: Scroll to the entry or enter the first letter of the name.
- Press
 . The Details screen for the entry will be displayed.
 - Editing a detail.
Deleting an entry
- Press to open the phone's directory.
- Selecting an entry: Scroll to the entry or enter the first letter of the name.
- If you want to delete the entry, press
