
Gigaset/Yeastar Desktop Short User Manual


Version: 19 June 2025
Additional:
Translation in your language, please select translation and language in your browser settings
Search function, please press "control + F"
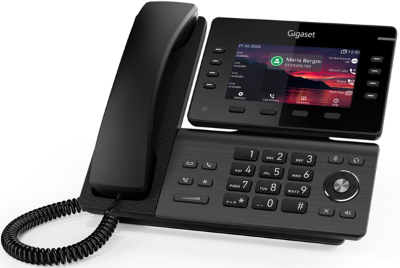
This manual describes the standard telephony features, how to use the Gigaset P710/P810(B)/P82X/P85X(B)W behind the Yeastar P-series.
For this document we use the P82X, there are hardware differences between the different phones.
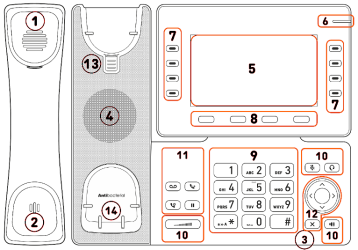
Getting to know your phone
- Handset earpiece
- Microphone
- Casing microphone
- Casing speaker
- Display
- Call status indication, indicates incoming, ongoing, held, and missed calls.
- SmartLabel keys (with multi colour LED)
- 4 context-sensitive function keys.
- 12 keys (standard ITU telephone keypad)
- Dedicated audio keys
- Dedicated function keys
- 5-way navigation key & Cancel
- Handset rest tab
- Hook switch sensor
7 SmartLabel keys
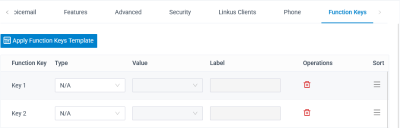
These keys are configured via the Yeastar web-interface:
Open the Yeastar web-interface and go to: Extension and Trunk - Extension - Edit - Function keys.
8 Context-sensitive, programmable function symbols and function keys F1–F4
Press the function key underneath the display symbol to activate the function, open the list etc. depicted by the symbol above the key.
Standard functions available on idle screen. Default settings and icons depend on firmware installed on phone.
 Settings menu
 Call lists (missed, received, dialed calls)
 Internal phone directory (This is standard, not the Yeastar LDAP phone-book)
 Status information (call forwarding active, passwords not set, missed calls, etc.) or, if no status info, to show phone's IP address and URL to Gigaset Wiki
9 Telephone keypad
Star key
In editing mode:
- Press for one second to change input mode (numerals > lower case > upper case)
- Press briefly to type *
On idle screen: Press for 3 seconds to lock/unlock the keypad
10 Audio control keys
 Adjusting the volume
- of the ringer when the phone is idle or ringing
- of the handset/casing loudspeaker when in a call
 Mute/unmute microphone
 Toggling between handsfree and handset mode. Press to dial number and accept calls on speakerphone.
 Headset mode on/off
11 Dedicated, customizable function keys
 MWI key with LED
- LED is lit when message is waiting on mailbox (if mailbox supplied on PBX)
- Press key to listen to message(s)
 Redial
 Transfer
 Hold
Hold
12 Navigation keys
- Canceling actions & input, and returning to previous screen
- Terminating calls on speakerphone and in headset & handset modes

- Confirming, saving actions & input, and returning to previous screen
- Accepting calls on speakerphone and in headset mode
- From idle screen: Missed calls (Call History)

 From idle screen: Select outgoing identity
 From idle screen: Received calls
 From idle screen : Missed calls
In other contexts (settings, lists): Navigate up/down
In other contexts: Navigate/space left
In other contexts: Navigate/space right
Using the phone
Making calls
Handset
Pick up the handset, enter the phone number, and press  OR enter the phone number and pick up the handset.
Headset
Enter the phone number, and press  .
.
Speakerphone
Enter the phone number and press  or or or the center key.
Handset or headset and casing speaker
With dual audio mode activated, other persons present in the room are allowed to listen in to the third party over the phone's casing loudspeaker.
- Use the method for handset or headset use to dial.
- When the call has been established, press
 to enable the casing loudspeaker. Press
  to turn the speaker off.
Accepting calls
Headset
Press . If the phone is already in headset mode, you can also press the blinking line key.
Speakerphone
Press or the blinking line key.
Call pick-up from another extension
You can pick up calls ringing on another extension, for example when the other extension is busy or when the user is absent,
- With Yeastar feature code *04 extension number
- Group pickup using feature code *4 (If configured)
- Blinking BLF key: Incoming call ringing. If the call is not answered, press the key to pick it up
Call waiting
When you are in a call, another call coming in will be announced visually by the flashing call LED and by the symbol appearing in the function key line; it will also be announced acoustically by a double beep.
When a call is waiting, you have the following options:
- Press the blinking line key of the call waiting to put your current call on hold and to accept the second call without knowing who is calling.
This option is available only when there is a free line key available at the time the call comes in.
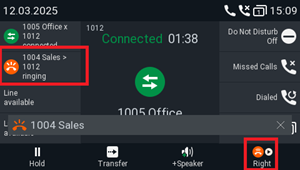
- Press the function key underneath
 to put the Call waiting screen on the display; you will see the caller ID on-screen if it is being transmitted.
- Press
 to reject the call waiting. The caller will hear the busy signal
 - Press to accept the second call and put your current call on hold
- Press
 to return to the Connected screen with your previous connection
 - Press Retrieve
 to go back to the call on hold and put the second call on hold
Note: Pressingand will affect the call shown on the display, i.e., your current connection, the call(s) waiting, or the call(s) on hold. - If there is more than one call waiting, press the keys or ,
 respectively, to bring them on-screen and to return to the connected call.
- Press
Hold
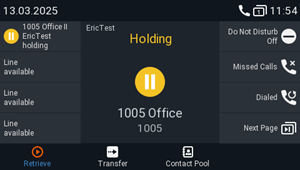
Press to put the ongoing call on hold. Held calls are indicated threefold:
- By the text on the display.
- By the slowly blinking line key.
- By the slowly blinking call indication LED.
- By the double beep.
You can now: - Transfer the held call blindly or with prior announcement
- Receive and make calls and put other calls on hold.
- Pick up the held call by pressing its line key or by pressing or again. If the other party hangs up while on hold, the call is terminated on your phone as well and the LED indicators are turned off.
Conference
The maximum number of participants is three.
Initiating a conference
- Call the first intended participant and put him or her on hold.
- Call the second intended participant.
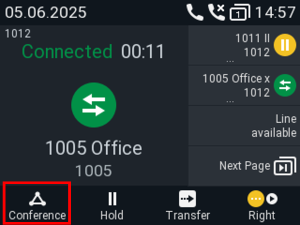
- When you are connected to the participant, press
 to start the conference.
Transferring calls
You can transfer connected calls as well as calls ringing on your phone.
- When you have a call on the line, there are two ways to transfer it to a third party
- Announcing the call to the third party first, to make sure the call is welcome and will be accepted: Attended transfer
- Transferring the call unannounced: Blind transfer. There will be no feedback on whether the third party is available and/or picking up the call
- When a call is ringing on your phone, you can transfer it to a third party without answering it first (blind transfer only)
Attended transfer
- Put the call on hold

- Dial the number you want to transfer the call to and announce the call. You can also select a number from the internal or one of the available external phone directories
- If the third party wants to accept the call, hang-up the call OR press 2 times
- If the third party wants to accept the call, hang-up the call OR press 2 times
- Press the BLF key, the administrator must change the setting from Blindtransfer to Attended transfer
Blind transfer
- With a call on the line, press
 or . The dial screen will appear.
 - Dial the number, or press
 to select a number from the internal or one of the available external phone directories
 - Press
 . You may briefly see two "Ended" messages followed by the callee and caller's name/number, indicating that the transfer was completed.
 - Press the BLF key, the default setting is Blindtransfer
Terminating calls
- When using the handset: Place the handset in the cradle or press
 .
. - When using speakerphone or a headset: Press .
Locking and unlocking the keyboard
When the keyboard is locked, only the emergency numbers configured on the Preferences page of the phone's web user interface can be dialed.
Setting a PIN to unlock the keyboard (optional): See "Setting a PIN to unlock the keyboard"
Locking
Press a  for three seconds. The lock symbol appears in the status line. It also replaces the identity symbol.
Unlocking
Press for three seconds to unlock the keyboard.
- If a PIN for unlocking the keyboard has been set, you will be prompted to enter the PIN.
Rejecting or redirecting incoming calls
If you do not wish to pick up a ringing call, you have three options: Letting the call ring and not picking it up, rejecting it manually, or transferring it manually to a third party.
- Rejecting a ringing call manually.
- Press . The caller will hear the busy signal.
- Press
- Press to transfer the ringing call to another phone (blind transfer).
Call forwarding
The phone can be set to forward incoming calls, either always or under certain conditions. The settings can be done on the phone and on the web interface.
Forward All: Forwarding all incoming calls to the number of the phone, extension, or mailbox specified as this function’s target.
In the default setting, the symbol is available in the function key line, and pressing the associated key turns forwarding of all calls on and off, respectively. You can also map the function onto another function key or use the settings menu as shown in the table below.
Forward when Busy: Forwarding calls ringing while the phone is busy to the number of the phone, extension, or mailbox specified as this function’s target.
Forward after Timeout: When a call starts ringing, the phone will wait for the number of seconds specified in the setting "Call forwarding time". If the call is not accepted by the end of this time period, it is forwarded to the number of the phone, extension, or mailbox specified as this function’s target.
Settings on the phone and turning on call forwarding
Forward all | Forward when busy | Forward after timeout | |
|---|---|---|---|
Press |
|
|
|
Press |
|
|
|
Press |
|
|
|
Press |
|
|
|
Press |
|
|
|
The setting changes from off (no) (Fig. 1, below) to on (yes), and the setting for the forwarding target appears. In the case of forwarding after timeout, the setting for the time span also appears (Fig. 2). | |||
Press |
|
|
|
Type | phone number | phone number | phone number |
Press |
|
|
|
Press |
| ||
Type | number of seconds | ||
Press |
| ||
Press |
| ||

 Call Features
 Call Forwarding
 Call Forwarding time
 for two seconds to return to the idle screen.
Turning off call forwarding
Forward all | Forward when busy | Forward after timeout | |
|---|---|---|---|
Press |
|
|
|
Press |
|
|
|
Press |
|
|
|
Press |
|
|
|
Press |
|
|
|
The setting will change from on to off, and the settings for the forwarding target and, in the case of timeout, for the time span will disappear. | |||
Press |
| ||
Phonebook
Directory in the device
The directory is the built-in directory of the phone. Entries can be added and edited on the phone and on the web interface.
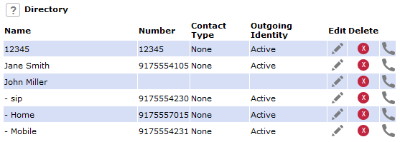
Any changes you make on the web interface will not take effect until you click "Save" or on "Apply" and "Save", depending on your firmware version. Changes will be lost if you open another page of the web interface without first clicking on "Apply"/"Save".
Definitions, explanations
Directory entries
Each entry must have at least one phone number; multiple associated phone numbers are possible. If you do not enter a first and/or last name and/or nickname, the phone number will appear under both "Name" and "Number".
- Entry with one phone number:

- Entry with several associated phone numbers:

Name area. Same data for the master record and all sub entries.
Blue area. Data can be different for each associated phone number. If sub entry text fields are blank, the data from the master record is displayed.
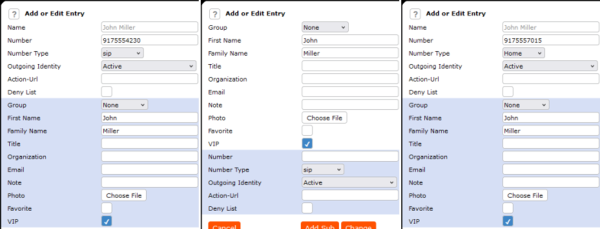
Contact Types
VIP: Calls from numbers with this contact type will ring on your phone even when DND mode is active.
You can assign a ringtone to this contact type. If your VIP is also assigned to a group (see below) and if that group has a distinct ringtone, the ringtone assigned to the group will be played.
Deny List: Calls from phone numbers with this contact type will not ring on your phone. The caller hears the busy signal. To remove the number from the deny list, you can either
- delete the entry from the directory by clicking on the delete symbol

- or - if you want to keep the number in the directory - change the contact type to none or VIP by editing the entry.
Outgoing identity
The default setting is "Active" which means that the phone will use the current outgoing identity whenever you dial the number of the phone book entry.
You can also select a specific identity to be used as the outgoing identity whenever the number is dialed, for example, if you want to use a specific VoIP provider for these calls.
Note: To use an outgoing identity specified in the directory, you must dial the number from the directory. If you simply type it on the keypad, the current outgoing identity, as indicated on the display, will be used.
Group
The available group types are Friends, Family, Work, Colleagues, or None. The default setting is none. You can assign a distinct ringtone to each group type.
Ringtones
The phone has 10 built-in ringtones that can be assigned to identities, group types, and contact types.
It is also possible to download a custom melody.
Adding/Editing Entries on the Phone
Adding new entry manually
- Press
 to open the phone's directory.
 - Press the function key underneath
 .
. - Enter the phone number and press

- Enter a first name and/or press .
- Enter a last name and/or press.
Note: Entering a first and/or name is optional. If you don't enter either one, the entry will be listed under the phone number. You can add a first and last name later by editing the entry on the phone or on the web interface.
Adding new entry from call list
- Press the function key underneath
 to open the call history. The list of all calls appears.
- Press / on the navigation key to show the lists of missed, received, or dialed calls instead.
- Press
- Press
 /
/  on the navigation key to select a call.
 - Press
 to view call Details.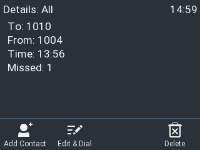
- Press
 to add the name (if the name was transmitted) and the number to the phone directory. If the name has not been transmitted, the number will be used in its place.
Sorting entries
- Press
 to open the phone's directory.
 - Press
 .
. - Use/ to select the criterion for sorting (nickname, first name, last name, organization, etc.) and press to sort.
Editing existing entry
- Pressto open the phone's directory.
- Selecting an entry: Scroll to the entry or enter the first letter of the name.
- Press
 . The Details screen for the entry will be displayed.
 - Editing a detail.
Deleting an entry
- Press to open the phone's directory.
- Selecting an entry: Scroll to the entry or enter the first letter of the name.
- If you want to delete the entry, press

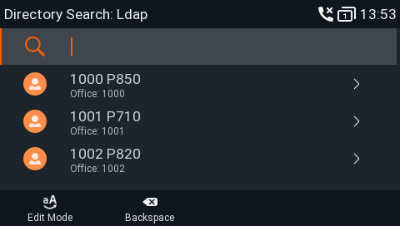
LDAP
This is the Yeastar phone-book.
To easy have access to the Yeastar LDAP phone-book you need to add the LDAP Directory to a function key, this is done via the Yeastar web-interface or if your device has the hardware key it is automatically assigned to the Yeastar LDAP phone-book.
- Press the function or key to open the LDAP Phone-book.
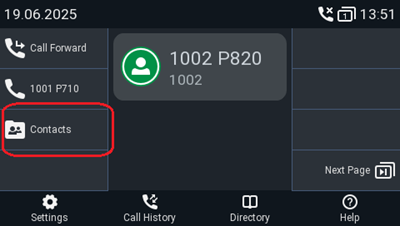
2. Press / on the navigation key to select a contact
3. Press  to open the contact and select the number
4. Press to start the call