

FAQ SPK - Manual

DECT Site planning Kit (SPK)
Table of Contents
Here we would like to explain how to prepare your DECT system to be used for Alarming, Messaging and Location connected to an Alarm server.
1. Safety precautions

Read the safety precautions and the user guide before use.
Comprehensive user guides for all telephones and telephone systems as well as for accessories can be found online at this wiki: wiki.gigaset.com. We thereby help to save paper while providing fast access to the complete up-to-date documentation at any time

The device cannot be used in the event of a power failure.

Use only rechargeable batteries that correspond to the specification (see list of permitted batteries). Never use a conventional (non-rechargeable) battery or other battery types as this could result in significant health risks and personal injury. Rechargeable batteries, which are noticeably damaged, must be replaced.
The handset must not be operated if the battery cover is open.

Do not use the devices in environments with a potential explosion hazard (e.g. paint shops).

The base-station is not splashproof. For this reason do not install them in a damp environment such as Cold rooms or Cold storage.

Use only the power adapter indicated on the device.Whilst charging, the power socket must be easily accessible

Remove faulty devices from use or have them repaired by our Service team, as these could inter-fere with other wireless services.

Do not use the DECT handset if the display is cracked or broken. Broken glass or plastic can cause injury to hands and face. Send the device to our Service department to be repaired.

Keep small cells and batteries, which can be swallowed, out of the reach of children.
Swallowing a battery can lead to burns, perforation of soft tissue and death. Severe burns can occur within 2 hours of swallowing.
In the case of a swallowed cell or battery, seek medical care immediately.

Using your telephone may affect nearby medical equipment. Be aware of the technical conditions in your particular environment, e.g. doctor's surgery. If you use a medical device (e.g. a pace-maker), please contact the device manufacturer. They will be able to advise you regarding the susceptibility of the device to external sources of high frequency energy (for the specifications of your Gigaset product see "Technical data").
2. Working with the DECT Site planning Kit
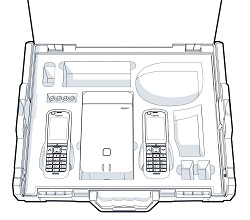
The Gigaset DECT Site planning Kit helps you to plan and install your DECT multi-cell system. It contains one measuring base station, two measuring handsets and further helpful accessories for exact determination of the DECT environmental conditions for the planned network, and is delivered in a case.
You can use the measuring devices in the case to determine the DECT wireless coverage at your location, establish how many base stations are required and their optimum location and find sources of interferences in the wireless network.
Additionally, you can use the equipment of the DECT Site Planning Kit (SPK) PRO to check the radio quality of problematic areas in an installed system and so eliminate network problems.
2a. Checking the package contents
- N870 SPK DECT base S30852-G2716-R701
- N870 Tripod mount C39363-L569-B1
- Power-bank 10.000mAh S30852-S2737-R11
- Power-bank Tripod mount S30852-S2737-R14
- R700H SPK calibrated handsets (2) S30852-G2976-R702
- USB-A chargers (2) C39280-Z4-C778
- R700H chargers (2) S30852-S2986-R101
V30146-A2147-D514 (USB cable) - 30 W USB PD-Charger C39280-Z4-C793
- USB-C → 12V cable: 3 meter V30146-A4028-D514
USB-C → 12V cable: 0.5 meter V30146-A1085-D514 - USB-C → USB-C cable V30146-A1083-D514
- Headset (2) S30853-S1217-R101
- Additional re-chargeable battery AAA (4) V30145-K1310-X308
- Security leaflet A31008-M2737-R101-1-X143

2b. Further recommended accessories
Stand

To obtain an exact measurement, we recommend that you mount the measuring base station and battery carrier securely on a stand. The base carrier is fitted with a thread connection for this purpose. This enables you to simulate the installation of a base station at every possible height and check the layout and range of the network.
The stand should have a screw thread and be extendable to a height of 2.50 to 3.00 m.
2c. Before you begin
Please note that the measuring devices run on batteries that must be charged before you start taking measurements. Bear this in mind when planning your time.
The Power-bank needs to be charged via the 30 W USB-C charger (fasted charging) or via the USB-A charger (Slower charging).
You need two batteries for each measuring handset. These can be charged in the chargers and in standard charging devices. The charging time in the charger is approx. 8.5 hours.
2d. Setting up the measuring base station
To ensure freedom of movement when measuring and not be dependent on being able to reach a power connection, operate the measuring base station via the power-bank. The case contains a power-bank and a USB-C charger device for this purpose.
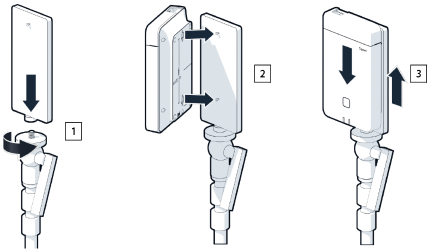
Preparing the base station
- Screw the tripod mount onto the tripod
- Slide the notches on the back of the base station over the hooks on the tripod mount
- Press the base station down until it clicks into place
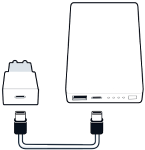
Charge the Power-bank
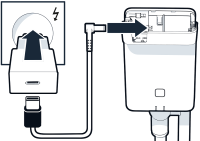
- Plug the USB-C adapter into a mains socket
- Connect the USB-C cable to the USB-C adapter
- Insert USB-C end of charging cable into the USB-C port of the power-bank
- When all 4 LED power level indicators become solid the power-bank is fully charged
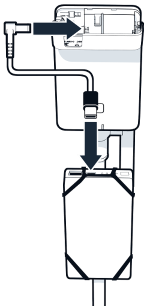
Mounting the base station and the power-bank
- Mount the DECT base on a stand
- Mount the Power-bank on the stand
- Connect the Power cable to power the base station
You can use the short cable if the power bank is mounted close the the DECT base or the long (3m) cable if needed. - You can power the base station for up to 20 hours continuously if the power-bank if fully charged.
Alternative power supply
The measuring base station is supplied with power via the power-bank.
Alternatively, you can also use one of the following power supplies:
- Power-bank
- 30 W USB PD-Charger
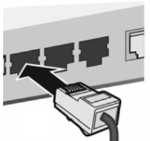
- PoE
2e. Starting up the measuring handset
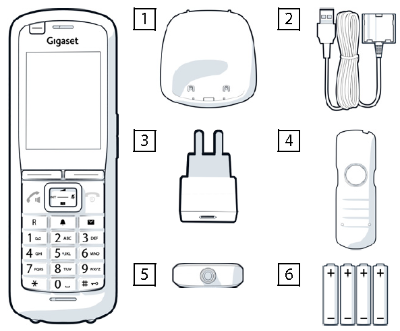
Remove the measuring handsets and accessories from the case. For each handset there is:
- One charging cradle
- One USB-A to cradle cable
- One USB-A power adapter
- One battery cover
- One belt clip
- Four batteries (AAA), of which two are spares
The display and keypad are protected by plastic film; please remove it.
Inserting the batteries and closing the battery cover
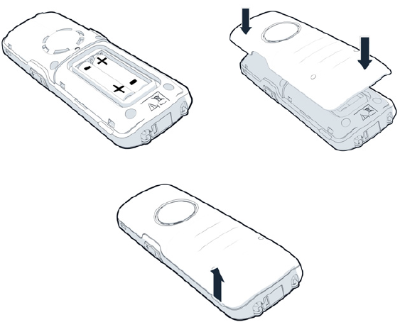
- Insert the batteries (for correct +/- direction, see diagram).
- Line up the battery cover at the recesses with the inside of the casing
- Press the cover until it clicks into place.
To re-open the battery cover:
- Remove the belt clip (if attached).
- Use your fingernail to reach into the recess and pull the battery cover up
Initial charging and discharging of the batteries
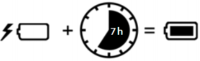
- Charge the batteries fully prior to first use in the charging cradle or using a standard USB mains adapter.
- The batteries are fully charged when the power icon disappears from the display.
Connecting a headset to the handset
To assess the quality of the sound transmitted from the measuring station, you can connect headsets to the measuring handsets.
This also means that your hands are free to enter the locations determined in the plan and you can read the display during the measurement phase.
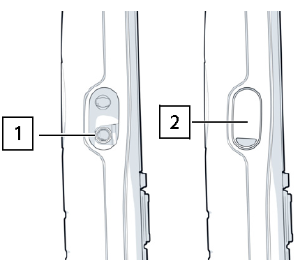
- The connection for one of the headsets delivered is on the left side of the measuring handset.
- If you do not use a headset, you should cover the headset connector with the rubber cover supplied.
The headset volume corresponds to the setting for the receiver volume.
2f. Power-bank
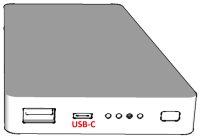
USB-A Port:
Power output port
USB-C Port:
Power output/input port
Power level / charging indicator:
Power level display button:
Push to show the power level
Indicates power level:
No LED: 0%
1 LED: ≤ 25%
2 LED: ≤ 50%
3 LED: ≤ 75%
4 LED: > 75%
Indicates charging status:
1 LED pulsing: < 25%
1 LED solid, 1 LED pulsing: < 50%
2 LED solid, 1 LED pulsing: < 75%
3 LED solid, 1 LED pulsing: < 100%
4 LED solid: 100% (Power-bank will stop charging)
4LED pulsing (5 seconds): Error the power-bank will shut itself off.

2g. Operating the measuring handset
The measuring handsets
- Are already registered to the measuring base station on delivery
- Calls between the handsets are possible using the number "1" and "2"
There are 2 measurements procedures supported:
- Advanced measurement procedure dialing ***922
- Simple metering mode
2.g.i Advanced measurement procedure
This measurement procedure can also be used in customer installed system when:
- DECT system software ≥ 2.53.0
- R700H/S700H/SL800H handset software ≥ 12.02
Only the SPK has calibrated handsets, therefore the usage of normal handsets will not provide calibrated values.

Display in advanced measurement mode
Start the measurement procedure via (dialing ***922)
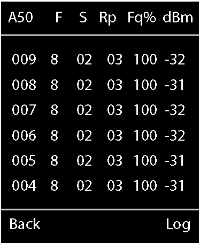
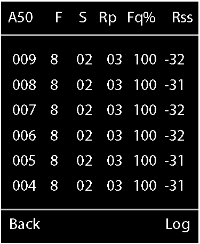
The following screen will be visible
Antenna mode
- Aopt = in call optimized antenna
- A50 = 50% mix of 2 antennas for idle status quality measurement
Antenna mode status information is heading the first column,
which is counter of the measurement values obtained during the given call.
As measurement values are updated every 960ms,
It roughly gives a timestamp in the measurement call in seconds.
F (Frequency)
S (Slot)
Rp (RPN)
Fq% (Frame quality)
dBm => RSSI indication from calibrated measurement handset.
Rss => rough RSSI indication from non-calibrated handset.
Calibrated handset:
Normal (not calibrated) handset:
Log measurement data
Press on the softkey "Log" to start an measurement and save the values on the DECT system.
HS Location:
Enter the location information where you start the measurement
BS Location:
Enter the location information where you have placed the DECT measurement base
Site:
Enter the information about the customer or the site name
Press on the softkey "OK" to start the measurement.
The measurement values are displayed. A new measured value is entered every 960 ms.

Stop measurement log
Press on the softkey "Stop" to end the measurement or
Measurement will stop automatic after 60 seconds

Save measurement data
Press on the softkey "Save" to save the measurement.

How to download the Measurement files
The measurement files can be downloaded via:
- Download button in Web-interface (From software 2.54 or higher)
- CLI
Download button in Web-interface
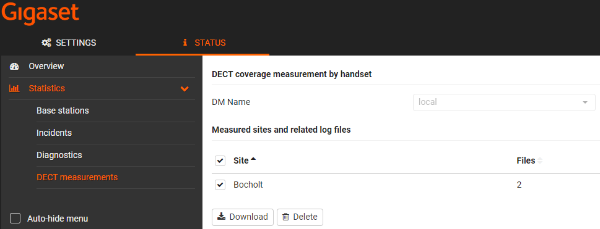
Form software 2.54 or higher the measurements files can be downloaded via the web-interface.
- Go to: STATUS - Statistics - DECT measurements
- Select the files you want to download
DM Name:
When measurement done in a live system with multiple DECT managers, you need to select the DECT manager where behind you did the measurement.
In case of an all-in-one system, you do not need to select the DECT manager.
Site:
The name of the Site you entered when you started the measurement
After download, you will have a tar file that with unzip you can extract. You need to unzip it 2 times to have the readable csv files with the measurement data.
- base-dm-int-589ec62904f3-measure-dump.tar file
- unzip →
- base-dm-int-589ec62904f3-measure-dump/base-dm-int-589ec62904f3-measure-dump file
- unzip →
- measurements/<sitename>/
- <sitename>_<hs location>_dps.csv
- <sitename>_<bs location>_<hs location>_measurement.csv
...measurement.csv
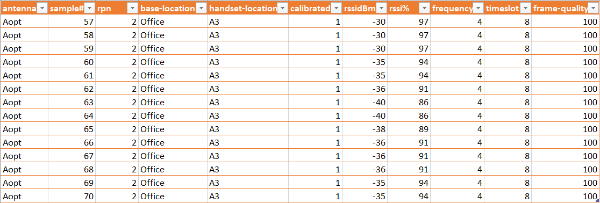
Contains the measurement log in csv format, next is an example in excel.
antenna: The selected antenna mode
sample: The measurement sample
rpn: DECT measurement base RPN
base-location: The base location entered via the handset when starting the measurement log
handset-location: The handset measurement location entered via the handset when starting the measurement log
Calibrated: 1 = Calibrated handset / 0 = Non calibrated handset
rssidBm: RSSI value in dBm
rssi%: RSSI value in %
frequency: DECT frequency
timeslot: DECT timeslot
frame-quality: DECT frame quality 0 - 100%
...dps.csv (Only needed when measuring in running installations)
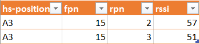
The file ...dps.csv contains information about all bases seen by the handset, this feature can be used to measure in running installations.
hs-position: The handset measurement location entered via the handset when starting the measurement log
fpn: FPN (Fixed Part Number) of the measuring base
rpn: RPN (Radio Fixed Part Number) of the measuring base
rssi: raw RSSI, depending on handset hardware platform
Just to relative compare base stations within this snapshot, but not to measure base stations!
If you start a longer measurement, when you stop the measurement, the dps scan is started and the ...dps.csv file is created.
Measurement files via CLI
Usage: measure-dump [<options>]
-h Show this help
-l Lists all sites of which measurement logs are available
-r <site> Remove the generated measure-dump.tar file (/tmp/pub/measure-dump.tar)
and the measurement logs of given site (dflt: all sites)
<site> Dump measurement of given site, if option is not provided, all sites will be dumped
Note: Don't forget to remove your measurement data, if download was successful.
Otherwise you might leave your data on the measurement device.
These files can be download via:
- WINSCP
- via your browser, example: https://<IP address>/pub/measure-dump.tar
- other SSH tools ..
Delete measurement files via handset procedure
It is possible to delete the Measurement files via the following handset procedure.
On the handset: <Menu> * # 05 #
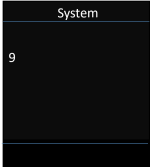
Enter: 8 4
9 8 4 SET [0] indicating no measurement logs
9 8 4 SET [1] indicating measurement logs
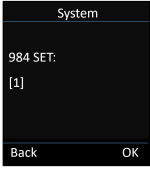
To delete:
Enter 0 to delete measurement logs
Press OK
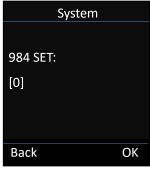
The measurement files are deleted

2.g.ii Simple Metering mode
In the previous SPK, we used the metering mode to show the current status values of the connection to the base station.
In the new SPK, this metering mode is disabled and for this, the advanced measurement mode is introduced.
It is possible to enable the metering mode. (Only supported by calibrated handsets)
Activating/deactivating metering mode
- Press and hold the off key
 to deactivate the handset
 - Press
 ,
,  and
and  at the same time and hold them down. Then press and hold the on key
 - The handset is now in Service mode
- Enter the five-digit service PIN. On delivery this is 76200
- The service menu is opened
Select the Metering Mode entry with the navigation key.
Press the display key Change to activate the entry.
Once you activate metering mode, the RSSI measurement menu is opened.
Here you can change the settings for the unit of measure and the measurement interval.
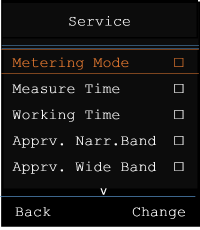
Changing the settings for metering mode
In the service menu, you can change the unit of measure and the measurement interval for metering mode.
Metering Mode (unit of measure)
On the display, the signal strength (RSSI value) is shown in dBm as standard. You can also display the signal strength as a per-centage value. This represents the signal strength of the pack-age received as a ratio of the maximum possible RSSI (100%).
Use the navigation key to select the desired display of the signal strength.
dBm: The signal strength measured is displayed in dBm. This is preset and is the recommended mode.
%: The signal strength measured is displayedas a percentage of the maximum possible RSSI
SEN: Not relevant.
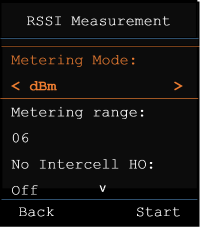
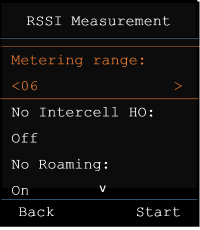
Metering range (measurement interval)
The measurement interval defines the time intervals at which measurements are taken.
Value range: 06 – 16 (1.0 s – 2.5 s)
Recommended value: 16
Use the navigation key to select the required measurement interval.
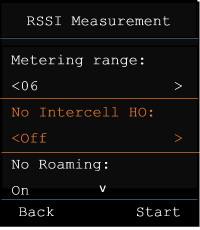
No Intercell HO:
This allows you to measure a single base in an installed multicell system when having an active call.
On: The measurement handset will not switch to another DECT base in the multicell system.
Off: Default setting, handset will switch to other DECT base in Multicell system.
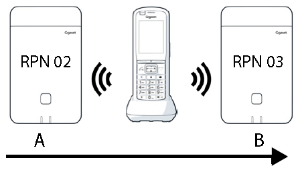
No Roaming:
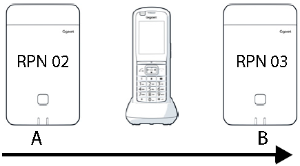
This allows you to measure a single base in an installed multicell system when the handset is in IDLE.
On: The measurement handset will not switch to another DECT base in the multicell system.
Off: Default setting, handset will switch to other DECT base in Multicell system.
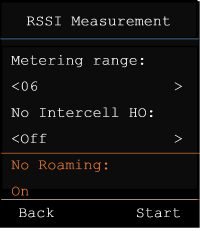
Start Press the display key to activate metering mode.
Back Press the display key to exit the service menu again.
The handset is deactivated. When you reactivate it, it is in metering mode with the selected settings.
2.h Antenna mode, how to change
We support the following antenna mode options:
A50 = 50% mix of the two antennas for idle status quality measurement
Both antennas are used for 50% which acts the same like if a handset is in idle mode. This mode is recommended to check quality, because it is typically
- seen by handset in idle status,
- seen from base stations synchronizing via DECT.
Measurement done in this mode can provide a lower signal quality then using the Aopt mode but for a DECT measurement it is the better method.
- Therefore this is the default setting for Gigaset DECT SPK PRO.
Aopt = In call optimized antenna
During an active call, the antenna optimization (diversity) is used. Where automatically the best antenna is selected by the system to offer the best speech quality.
This is the default setting for regular base stations of the Gigaset DECT PRO product family, to select best antenna in call state.
3 Customer service and help
Do you have any questions?
For quick help and information, please refer to this user guide or visit our wiki: wiki.gigaset.com
For online information and services concerning
3.a DECT measurement base how to create/configure from scratch
Here we describe how:
- You can create an DECT measurement base using an normal DECT base
- Restore DECT SPK base after factory reset
If you want to create your own DECT measurement base or restore the DECT SPK base after you have given it a factory reset you need to follow the following procedure:
- You can use an N870 / N870(E) or even an N670 device
- Upgrade your DECT system to software 2.53.0 or higher
- The R700H SPK handset must have software 12.02 or higher
Download the provisioning file
The default IP address = 192.168.143.1 if you want to use your own IP address, you can change it in the template before uploading the provisioning file in your system.- Open the web-interface of your DECT system, go to: SETTINGS - System - Provisioning and configuration - Browse:
- Select the provisioning file and click on "Upload" and then "Start auto configuration"
- Wait until Left LED is Blue and Right LED is Green
- Register the 2 calibrated measurement DECT handsets PIN = 0000
- Power N870 without LAN and check if calls between handsets are possible
Handset 1, number is "1"
Handset 2, number is "2"
3.b SPK DECT system default settings
The SPK DECT base has the following default settings:
3.c Change the static IP address to your own preferred IP address
Via auto-provisioning
If you want to change the default static IP address 192.168.143.1 to your own preference, you need to follow the following procedure.
- Download the provisioning file on this page
- Change the IP address in this provisioning file to your own preference
- Upload the provisioning file and start provisioning
Via the web-interface
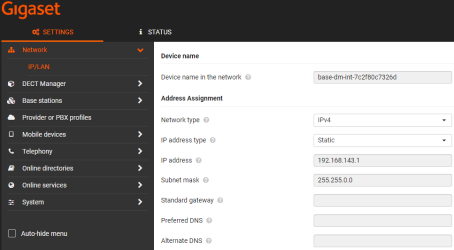
Open the web-interface and go to:
SETTINGS - Network - IP/LAN and change the IP address
3.d How to get the IP address of my SPK DECT base
Via one of the connected DECT handsets, it is possible to get the IP address of the SPK DECT base.

3.e Firmware update
- DECT base: Via the web-interface you can upgrade the SPK base with an actual firmware: Firmware N870(E)N670N610
- SPK handset: Via Quicksync or SOUTA you can upgrade the SPK handset with an actual firmware: Firmware SL800H S700H R700H PRO