
FAQ - Microsoft Teams Integration: How to trace and read the syslog output
Below you can find information about http / syslog output and read the provisioning file when registering an handset against the Microsoft Teams platform.
If you have an all-in-one system the principal is the same but you only need to trace the Integrator/DM device.
- Virtual Integrator is installed
- 2 DECT managers
- Software version 2.54
- CLI access via ssh is enabled
- Syslog is enabled: Info / Debug / Warning / Error
- When debug is enabled you have more provisioning parameter output
- Provisioning file is uploaded via the web-interface
- Wireshark trace is started on DECT manager and Integrator
- Traces are stored after filtering "http or syslog or sip"
- Traces merged to make it easy to search in one trace
System overview
When using an Integrator system.
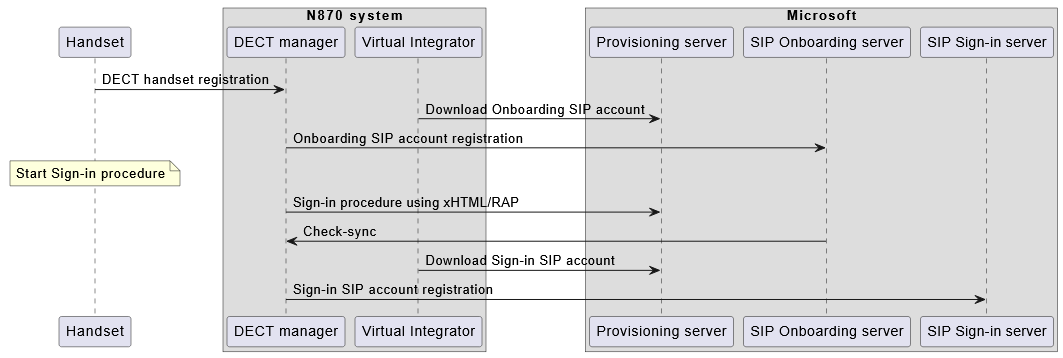
- Auto-provisioning is done by the Virtual Integrator
- SIP is handled by the DECT manager the handset is connected to
Sequence Diagram
Step 1: Add DECT handset
- In the web-interface go to: SETTINGS - Mobile devices - Administration
- Add an DECT handset, select as VoIP provider "Microsoft Teams onboarding"
Check:
Trace shows provisioning.xml is downloaded
provisioning.xml file is downloaded via WinSCP (optional)
Content of provisioning file is correct
As soon as the handset is registered, the Integrator will start downloading the auto-provisioning file: provisioning.xml
This can be seen by looking at the wireshark trace:
- Provisioning is done by the Virtual Integrator
- wireshark filter = http
- Look for GET /provisioning.xml or filter = http.request.uri == "/provisioning.xml"
- Right click on GET /provisioning.xml
- Follow - HTTP traffic to see the provisioning.xml file content
Trace integrator: Filter HTTP, follow HTTP stream
<provisioning version="1.1" productID="e2">
<!-- Gigaset DECT - Initial Configuration File -->
<!-- Version: 15/06/2022 -->
<nvm>
<!-- Show display name on Handset -->
<param name="DmGlobal.0.HSIdleDisplay" value="1"/>
</nvm>
<custom>
<!-- Download CA -->
<step type="certificate" url="http://emea.httpblob.sdg.teams.microsoft.com/certs/CA_Combined.pem" flags="FORCE_ACCEPT"/>
</custom>
<!-- Link to unique file -->
<EXTENDED_PROFILE class="string" value="https://euwe.dm.sdg.teams.microsoft.com/device/ob/496278775210aa48fd8967a26fb191d57a3e698d/lang_en/00%IPUI.xml"/>
</provisioning>
The provisioning file can be downloaded via WinSCP, see: WinSCP
Server certificate: (Depreciated)
Dependent on the provisioning.xml, a server certificate can be downloaded but this is depreciated and should be removed.
Onboarding SIP account provisioning download was successful
00<IPUI lower case characters>.xml file is downloaded via WinSCP (optional)
Onboarding SIP account will be downloaded.
The EXTENDED_PROFILE parameter in the provisioning.xml file contains the link to the DECT handset SIP Onboarding account.
This Onboarding SIP account that can only be used to start a Sign-in.
Download is secure HTTPS traffic and can't be read in the Wireshark trace as you need the security key.
This can be seen by looking at the wireshark trace:
- Of the Virtual Integrator
- Edit - Find packet - String: provisioning XML from
In the trace it can be that there is an error with the VoiceMailMailbox, you can ignore this. Due to this error you will also see: Job for node [EXTENDED_PROFILE] failed, line 14\n but this can also be ignored.
Check if the device has an successful SIP registration see the next chapter.
Onboarding SIP account Registration is successful
Onboarding SIP account successful SIP Registration
Please check if the Onboarding SIP account is registered.
- SIP registration is done by the DECT manager the handset is connected.
- In case of an integrator make sure to check the trace of the DM where the handset is connected.
- Wireshark: Edit - Find packet - String: registered
- Example: Message: Nov 27 16:10:54.000 s_local@N870_Left_1 sip-control: [SIP][I][Account.cpp:300] Account #035edb3a92(@PBX): Registered.\n
035edb3a92 = The DECT handset IPUI (The handset we used for this test)
- Example: Message: Nov 27 16:10:54.000 s_local@N870_Left_1 sip-control: [SIP][I][Account.cpp:300] Account #035edb3a92(@PBX): Registered.\n
Step 2: Sign-in
The user will start the sign-in procedure with the DECT handset.
Check-sync is received
After successful sign-in the Microsoft Teams will send a SIP Notify with Event: Check-sync message to the DECT manager where the Handset SIP account is registered.
This Check-sync is forwarded to the Integrator that starts the provisioning.
This can be seen by looking at the wireshark trace:
- Of the DECT manager
- Wireshark: Edit - Find packet - String: Check sync received

Sign-in SIP account provisioning is started
00<IPUI Upper case characters>.xml file is downloaded via WinSCP (optional)
Sign-in SIP account provisioning is started
After receiving the Check-sync, the Sign-in SIP account will be downloaded.
- Of the Virtual Integrator
- Wireshark: Edit - Find packet - String: Provisioning Started
Sign-in SIP account Registration is successful
Sign-in SIP account successful SIP Registration
Please check if the Sign-in SIP account is registered.
- SIP registration is done by the DECT manager the handset is connected.
- In case of an integrator make sure to check the trace of the DM where the handset is connected.
- Wireshark: Edit - Find packet - String: registered
- Example: Message: Nov 27 16:11:32.000 s_local@N870_Left_1 sip-control: [SIP][I][Account.cpp:300] Account #035edb3a92(@PBX): Registered.\n
035edb3a92 = The DECT handset IPUI (The handset we used for this test)
- Example: Message: Nov 27 16:11:32.000 s_local@N870_Left_1 sip-control: [SIP][I][Account.cpp:300] Account #035edb3a92(@PBX): Registered.\n
Step 3: Download the provisioning files
If needed, the provisioning files can be downloaded from the N870 via WinSCP
Download the provisioning files using WinSCP
As you have enabled CLI access via SSH, via the tool "WinSCP" you can download the provisioning files.
- Create a New Site using the settings below, with the IP address of your Virtual Integrator.
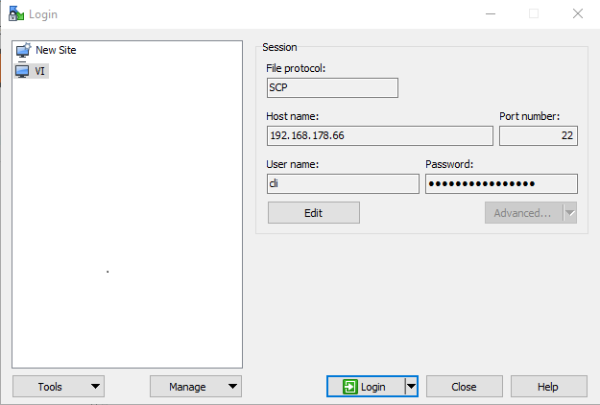
- Open the session
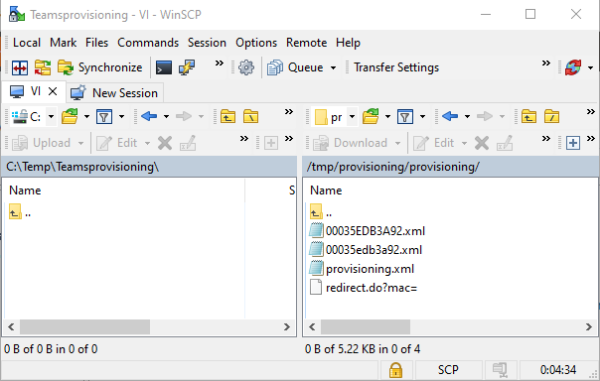
- Go to: /tmp/provisioning/provisioning
- And here are your provisioning files located
- provisioning.xml → Starting file when registering your handset
- 00<MAC address lower case characters>.xml → Contains SIP Onboarding account
- 00<MAC address Upper case characters>.xml → Contains SIP Sign-in account
How to Mark the required packets in Wireshark
If you want to have all needed packets in a simple Wireshark view: (Syslog all options enabled)
- Mark these packets in Wireshark: Edit - Find packet - String:
- Provisioning XML from
- provisioning.xml
- Downloading file from
- "DisplayName"
- Registered.\n
- Not registered.\n
- Check sync received
- /certs/
- Export: File - Export Specified packets - Marked packets only
- View marked packages only: Use the filter frame.marked == 1
Example:

If you want to have all needed packets in a simple Wireshark view: (Syslog, debug is disabled - Less output)
- Mark these packets in Wireshark: Edit - Find packet - String:
- Starting provisioning job
- provisioning.xml
- EXTENDED_PROFILE
- Registered.\n
- Not registered.\n
- Check sync received
- /certs/
- File - Export Specified packets - Marked packets only
Example:

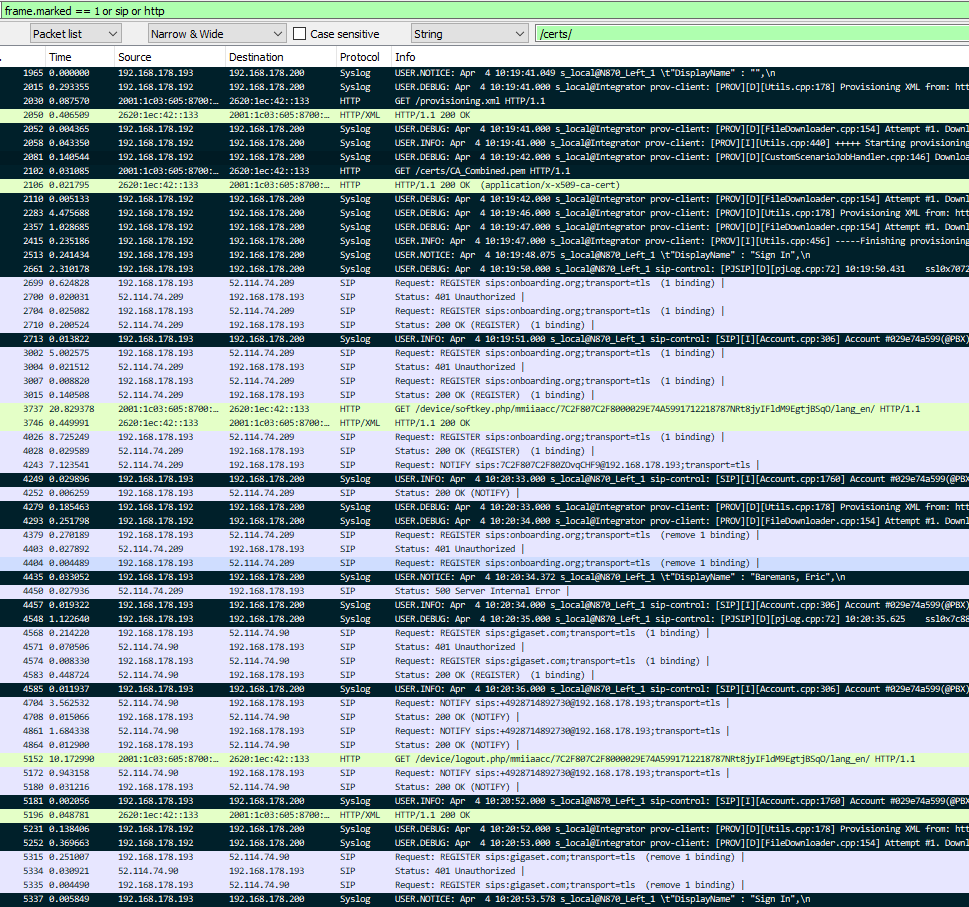
Next a example trace that contains the syslog (marked), SIP and HTTP packages:
- Register new DECT handset: Packet 1965 - 2710
- 1965 handset is registered
- 2015 provisioning is started
- 2106 Certificated is downloaded
- 2283 Downloading Onboarding SIP account settings
- 2513 Shows the correct display name "Sign In"
- 2699 SIP registration started for Sign-in account
- 2710 SIP 200 OK, onboarding account is Registered
- 3737 Sign-in procedure via Softkey (XHTML/RAP) is started
- 4243 SIP Notify with check-sync is started
- 4279 Start provisioning of SIP account
- 4435 Shows the correct End-user name
- 4568 SIP registration with user SIP account is started
- 4583 SIP 200 OK, user account is Registered
- 5152 Sign-out procedure via Softkey (XHTML/RAP) is started